Hi, Im Shelly Cordsen with expertvillage.Com
and Im calling this segment picture perfect. All that means is there are so many ways to
accent your pictures just to make them pop versus just handing them your packet of pictures
and saying, oh look at these and I did that last night. I said look at all these China
pictures I finally got developed and theyre like oh yeah cute, cute, then I brought out
my little 6x6 scrapbook, same set of pictures and the little things Ive done to the pictures
to make them pop, cut them. Everybody was saying, oh look, oh look because youre
really drawing attention to the subject in the picture when you scrapbook.
Theres
a lot of ways to make your picture pop out but the most common way is to matte it and
were using this lovely paper called bris to matte all our pictures to coordinate. The
standard thing is I have a 4x4 picture here, you always make your matte a quarter of an
inch bigger. So I will cut this paper 4 x 4 and then youll lay your picture
on it and Ill just our little lead positional tape real quick and look how that just popped
out. I trimmed a lot of background off, so it just really pops out that shes there.
Some of the other ways is you can see here, put it on point, cut it where hes at an
angle and I rounded the corners, you can buy a photo, oh I guess they call it a corner
rounder, you just stick the corner of your paper in there and punch and it rounds them
off.
You can do that to your pictures, to your matting, just give it a little soft touch.
What I have found if I cut a lot of background down and just pull the face up, it really
pops out. Heres another sample where I. Just bordered the picture and then sat into
the frame. Just simple, heres some where I took and used a circle cutter, use the coluzzle
and well go through that in another segment, fun, fun tool.
Heres one where I cut a
circle out of the middle of a photo, put a photo matte under it and then laid it on top
of the background again. Here I cut out the little swing, there is so much that you can
do to accent your pictures even down to stamping using eyelets, brads, ribbon, stickers, more
stickers, fun stuff like scrabble pieces, more stickies, there are a lot you can do,
you can get into a lot of money this way, but it is loads of fun but just basic here,
hardly any money into this just three sheets of paper..
Hi, Im Shelly Cordsen with expertvillage.Com
and now Im going to show you a system called the coluzzle last promised and its just
a fun tool to use in cutting pictures up, helping assist in making your mattes, its
just a lot of fun things to do, and Im going to demonstrate one of the fun things
to with it. In the coluzzle system you will have a foam mat, and you have to work them
out or youre going to cut holes all in your tables. You have different stencils,
weve got round, ovals, squares, rectangles, they have alphabet and this other one I have
its like file folder tags that you would cut out and then fold them in half. The most important
tool of this is the blade and its hard to tell but right here is a real sharp blade
and it swivels around, so as youre moving this blade around you dont have to lift
it anywhere out of the track.
To demonstrate this, I have a picture here and Im going
to use the round and Im going to focus this girls face right in the center and Im
going to choose which of these I want and I can cut them all, I can choose I want the
biggest part of her. Then what I would do is take my card stock complementary color
and then cut it one ring bigger and then I. Have a perfect circle mat, so you can use
all of these for your matting system. Im going to just cut her out over and over and
over and make spirals, so you stick the swivel blade into the glue and youll go around
and you never lift your wrist up, slip the blade again and then Ill come into the
next area and you just go around and around.
Sometimes if youre working with a lot of,
a big piece itll be a good idea to take your picture to the stencil. Usually I just
slide the glade around to the next groove and come into the next one. Theres little
spots you have to jump over because you dont want your picture totally falling apart when
you lift it up and thats about how far out I can go. When I lift this up, youll
see all these little things right here and then what youre going to do is youre
going to get your scissors and youre going to cut all these little connecting spots apart
and then youll have just your ring.
To show you as a sample, well heres one coluzzle
we cut in circles and then I just pop them each one out and layered them till we come
down to a good focal point. Another one we took one of the rings out plus the outside,
same here we took every other ring out, we used all the scraps from all these just to
create a geometric design that if you just want to fill up some space on a page. Heres
one I took rings out but I used the background and kind of gave it some dimension, if you
wanted you could even twist these and make the background where theyre not all lining
up, look how much fun that can be..
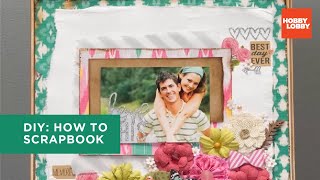
Hi I'm Joy Rose with the Hobby Lobby Creative
Studio and today we're talking about scrapbooking! Scrapbooking is one of the best ways to display
and preserve your memories, whether you're doing full-page spreads like these, trying
your hand at pocket pages, or creating layouts to place in frames or trays. Now there are aisles of scrapbooking supplies
to choose from at Hobby Lobby, so let's show you the basics and get you on your way!
So first up is deciding on an album. There are a bunch of different types and sizesand
pros to whichever one you chooseso it's really just your personal preference! You'll probably notice that 8 x 11 inches
and 12 x 12 inches are the most common sizes in both albums and paper, but don't pass up
cute mini albums like these! We love using them as coffee table books.
So now that you have your album picked out and it's stocked full of page protectors,
it's now time to select your paper. Now there are numerous patterns to choose
from and they can match just about any theme, ranging from vacations and holidays, to children
and weddings.
We especially love paper packs because they
take the guesswork out of choosing coordinating colors and patterns for layouts. The whole
stack just works together seamlessly! You'll want to grab some cardstock, too, which
is available in single sheets or packsand basically every color imaginable! There are
so many uses for it, too, so don't worry about having too much.
For something a little different, we also have specialty papers to choose from, like
glitter, vellum, and foil. Now you can mix these with our patterned paper for an extra-special
touch! Alright, now it's time to talk cutting tools
and we're assuming you have a few pairs of scissors lying around you're definitely
going to need thosebut how about a paper trimmer?
A paper trimmer is a must-have for scrapbooking since it makes measuring and cutting paper
so quick and easy. Plus, it gives you all the straight cuts and clean edges you'll need.
Rotary cutters and craft knives are pretty
handy too. Just remember to use a craft mat to protect your work surface!
Now, you might also find yourself pining after paper punches, so go ahead and grab some of
those basic shapes, like circles, squares, banners and corner rounders. Alright, you have your paper and a way to
cut it, so now it's time to stick it down with some adhesive!
Non-toxic and archival safe adhesives are the best route for scrapbooks, since other
types of glue can damage or discolor photos and paper over time. There are a lot of adhesives to choose from,
including tape runners, glue sticks and pens, Glue Dots, and even photo corners.
Just pick
what works best for your needs! The same "archival safe" rule applies to the
pens you use for scrapbooking, too. We have plenty of acid free, archival safe pens at
Hobby Lobby which are designed to keep your dates and details from damaging your pages
or fading away! OK, now for our favorite part stickers
and embellishments! They add such special detail to pages, and they help tell the story
at the same time. There's no shortage of stickers at Hobby Lobby,
including alphas of all sizes. Look at how they make this title pop off the page! Whether stickers are big or small, flat or
dimensional, they really bring the personality to scrapbooking layouts."
As far as embellishments go, the possibilities are limitless.
There are a ton of 2- and 3-dimensional
pre-made kinds, like these flowers and bows here. Or why not try making your own? We have
all the supplies for that, too! Now, what if you have to run and can't finish
a page? Well that's simple. You can just stow it all away in a storage box or sleeve made
especially for scrapbooking! Well, that's all we have for today and we
hope that you can get started on your very own scrapbooking stash and start recording
those cherished memories! Thanks so much for joining us today and we'll see you here next
time at the Hobby Lobby Creative Studio..
We are still talking about scrapbooking and
the different options that you have when it comes to time and money to invest in these
scrapbooks. And this is the scrapbook that I saved for last. We call it the advance level
scrapbooking. I made this one for my boyfriend for our one year anniversary.
This one took
me about a month to complete and about two hundred dollars. So, it wasn't exactly an
inexpensive present but like I said, it's very more personal and very meaningful to
the person that's receiving it. It was so thick that I had to bind it together with
some ribbon. But, just by doing that I punched holes and the first and last pages and tied
the ribbon so that it could be closed together.
Because, it was very thick and hard to keep
shut by itself..
Hi everyone welcome back to my channel
it's Keren here and I'm really excited because I just got the two new
collections from Prima marketing I. Recently did a YouTube video haul with
the two collections one is Habana and the other one is Santorini and today I'm
gonna be working with the Havana collection and just I'll recap what I
shown you I just wanted to show you that papers it comes with six double-sided
papers but it comes with 24 sheets so it comes with a lot of sheets in each so
you can really get a lot of things done with it you can do like a mini album you
could do layouts and I love doing layouts i've been doing layouts for
years and years and years and I really really love doing that I haven't done
them in a while and I just thought you know what I should get back to doing
layouts I really love doing them I love documenting my kids pictures my pictures
so I'm really excited to show you and this is like the first page which is
actually the one I'm going to be using it has the beautiful little birds but
I'm actually going to use the back of it I really love how distressed it is and I
wanted to show you that I do a lot of layouts with very plain papers and add
things to it but this one is quite busy and I want to show you how to work with
it and how to use a busy paper and to make it work so I'm gonna be using this
one but let me just show you the rest of the papers so there is this one which is
originally this is what I thought I. Would use because it's quite plain and
it has a really nice foiled flower background as well on the other side
which I could cut out and use as embellishments then there is this one
which is kind of looks like a pink wood green and lots of little embellishments
you can cut out so it's really nice you have this one and for this one I'm
definitely gonna use this one so I'm gonna take it out and the reason why I
love cutting out and kind of matting the picture this is a great paper to matte
pictures with so I'm going to pull this out and cut a few elements from it so
that's definitely one of the papers I'm going to use and let's see what else we
have look at these beautiful bird papers in it yes this is the next one and it
has like these lettering on the other side so that's really cool I almost
wanted to use this paper but it was a bit
- bees busy I think if it would have not had the foiled accents I would have
thought of something maybe I will use it in the future I just haven't decided yet
and look how beautiful these two are so these are the six sheets but I'm
definitely you're gonna use those other two and I'm gonna leave them here just
to show you what I'm going to do I also have the chipboard embellishments and of
course I'm listing everything below in the description area as I always do
so that way you can go ahead if you want to purchase any of these there is links
to everything as well for this one I am want to leave some of the elements but
I'm going to create a little background a textured background and with this so
to show you what you can do with these type of backgrounds that are really
really busy so let's get started ever since I got these papers since the name
is Havanna keep on wanting to sing that song they have an assault it kids it's
in my head all the time so I don't know what to do I trying to get it out of my
head but I can't so let's get started I'll try to not hum it what I while I'm
working and I'm gonna work in real life time in real life I mean the video is in
real time in real time it's not what it's called I don't know I get confused
just because I want to show you the process I will cut it down some of the
things when I'm drying and stuff like that but I really want to show you how
you can like use these busy backgrounds to kind of work it for your advantage so
what I'm going to do is I took a palette knife and this is just a regular palette
knife and I took some white gesso this is the heavy white gesso from Prima and
what just so does it gives a really nice priming or a really nice base to your
background and it also helps you hide what you don't want now if you want to
keep this completely clean and not have to you know cover anything I would
consider putting clear gesso or a coat of clear gesso on everything but I want
to add white gesture because I want to hide some of the things that I don't
really want for example this car doesn't really belonging to my theme of what I
want to use the pick bag for my picture so I want to kind of hide that so what
jess is the perfect thing to do that so I'm gonna take a little bit
and what I do it here's another car over here and what I'm going to do is I'm
going to kind of add it roughly and the reason why I want to add it roughly is
because I really want that texture to kind of stay in my background so I am
covering it with white gesso in the areas where I want things to kind of
hide I do like this camera so I don't want do not want to hide that and
sometimes I need to switch palette knifes not really liking this one as
much let me try this one it's giving me like these lines that I don't want I
want to have it's not so much I don't want to have lines I want to have a
smoother background but covering what I. Don't want so you see it's quick and
it's it's more or less translucent I do not want to fully cover it I want to
have that trend translucent so the truth translucent kind of way of seeing it so
you could see a little bit behind it but most of it is covered the more just so
you put of course the more it will cover it and you go from that and I'm taking
away a little bit of the pink not all of it I do like the pink there it kind of
gives me a tropical look but I want the most of it to kind of disappear a little
bit you can see I'm just basically applying it and I'm going to dry it out
I'm not putting too much here where the camera is because I really love that but
I'm trying to just put a little bit to kind of match it all up so you still get
that really nice distressed look but it's not so prominent and you get parts
of it you get the newspaper kind of look and it's really really nice so that's
basically all it is it's really really quick I'm going to heat set it with my
heat tool which I'm getting right now and that's
basically really really quick don't put a thick layer a thin layer is enough and
you can put sicker layers in the areas where you really want to cover the
design so hold on let me dry this up and I'll go to the next step okay once the
gesso is dry I really like adding some kind of a little bit of color in the
background and I recently got these art philosophy metal pastel accents metal AK
metallic accents these are watercolors and they're very metallic and also from
Prima marketing and I have the first set this is the second set and it's very
metallic and it's very pastel looking and it was perfect for this layout and I
really want to this color this seems like it's the perfect color for what I
want and I'm going to add a little bit of maybe gold as well I don't know we'll
see what I what I come up with so the first thing I want to do is I really
want to kind of wet it and I want to see how the cause I haven't used these but I
am really excited to use them I remember them being really creamy at least the
first set beautiful so what I like to do when I have layouts is that I like I
like using color to kind of accent things so I sometimes use the color
bloom sprays for water colors and they make things look beautiful
and you do have to add layers of things in order for it to kind of be seen and
what I'm doing is I'm adding the color it's hard to see and I'm just watering
it down a little bit soit blends when you put watercolor or spray over gesso
it gives it a really nice texture and its really nice to see and this is just
a first background the first layer of the background and I want this color
because kind of I'm pulling it in from the background this is a good color to
pull in from the background because it's already it's accented in different
places so you have to do is just do that and just acts
so I'm going to dry the first layer because I want it to be darker and in
order for it to be darker I need to kind of dry this layer in order to have the
second layer kind of gone now the first layer is dry I can show you how metallic
it is you can really see the metallic accents when I move the paper you see it
over there it's really really cool how you see the metallic and on it but I
want to as I said add a little bit more color so I'm going to wet this again and
add the second layer which hopefully will make it a little bit darker and
that makes a difference when you're trying to add embellishments on top so
I'm following kind of where I put the white gesso then why gesso protects the
paper so the paper doesn't like kind of destroy itself once I'm putting the wet
stuff on because when you put the gesso or when you put wet elements especially
something like watercolor you can really destroy the paper right because it is
paper after all so this helps the the gesso helps it kind of stay in place and
not and not destroy the background and not make a hole in the paper so it's
really really nice and I haven't decided if I want to put more colors yet I'm
still just keeping this color because she's the one that I love I love teal
it's one of my favorite colors I think it is my favorite color teal aqua things
like that so I'm kind of centering the photo around here which is what is
happening so I just wanted to add and now it's a little bit darker once you
dry it it really the metallic colors really come up and I really it can also
move things around kind of a help it move a little bit create is really nice
designs on it up and down to the side and then dry it up so again I'm gonna do
the same thing I'm gonna dry it up and then I'm going to continue with the
next layer if I think that I need another layer then I will do that as
well as with any mixed-media style layout
you're gonna get a little bit of warping especially at the edges when you add the
wet stuff but that's okay you can always put something heavy and just flatten it
out I don't do this in-between and I don't
really care but if you do want to you can definitely put something heavy on
the corners here and then it will flatten it out and the other thing is
that I like working in layers with any mixed-media and layout I like working
layers so the next layer is after putting the colors I want to add a
little bit of texture with a stencil with some modeling paste I love doing
that that's the kind of my staple is to put modeling paste on basically
everything and create patterns and I.
Love this then so this is my juggles
I will list it below I can't remember the name of it leave fronds or so I
don't know they look like palm trees to me and what
I do is I love creating kind of like that Tom tree look as if it's coming out
of the photo I kind of know that the photo is gonna go here in the center
somewhere and I'm going to use light paste to apply this you can definitely
apply the light paste with sat with a palette knife but I love applying it
with my silicone brush it's the easiest way and doesn't get in between the
embellish letting the prongs we didn't the underneath the stencils you still
don't have to be careful with it and I'm going trying to do it in a way that it
will not lift the stencil up so what I. Do is I go against the stencil so if
that makes sense you need to be careful with this type of stance so because it's
a very delicate especially because the leaves are not attached to each other so
in that sense they're very very delicate that way okay I'm going to lift it up
there you go you have one the and then I'm going to let's see which
one I want to put on if you want to dry in between you can do that that way it
will not interfere with what you're doing small leaf over here and that way
it will not go on top of the other one a mite drying between in this case I just
don't want them to get ruined sometimes I don't care and I'm very careful but in
this case I want to make sure that I. Don't get it ruined see how many leaves
I can get before I have to dry up because it takes longer and I'm very
impatient so I don't like drying up in between I like doing it all at once and
then drying it all at once but that might take a long time so I'm not sure
if I want to do that I might be able to fit one more leaf over here kind of
sticking out of this one but you have to be very careful because it could
definitely ruin things if there it kind of touch each other well just smush the
other one I do want to add one more bigger leaf but I think I'm gonna dry in
between it's too much to try to add this yeah let's see this one do you think I
can add this one here before I live yeah I might be able to actually get this one
and then I want a smaller one over here then that works well okay perfect so let
me get this this one over here I think it does fit I love using this soft paste
the light paste I meant to say but if you don't have a light paste you can use
any type of modeling paste for it the light pace is just smoother and I don't
have to explain it it kind of doesn't bunch up all the different areas okay okay so that looks good it's hard
to see here when I lift it up you can kind of see the nice texture that it
gives me I wonder do I need one at the top no I think it looks weird there
let's do that and make sure you wash your stencils really really well after
using them okay that's good so I'm not even sure I might need a smaller one
here look at this you see I'm able to somehow get it all done without having
to dry up in between this might need one of these here no I need to dry so let me
just dry this up and then I might put another one over here the nice thing
about cleaning up a stencil and drying up everything is that you could actually
flip the stencil and use the leaves in the different direction so that works as
well so if you do have the patience to dry things out which this piece does
dries really really quickly you could definitely switch the
direction of a stencil and get a different texture and a different way of
it just I mean a different way to see it and that's what I like about you know
stencils they can be used in so many different ways and so many different
designs and direction so unless the stencil is equal in all sides you could
just turn it around and use it a different way and here I'm making the
last leaf and that's it and they're kind of bunched up here together I'm going to
dry this one again clean up my stencil and then go through the next layer so as
I said before I was going to cut up that other piece of paper and this is what I
did I cut it with scissors but I'm not very straight when I cut so I might rip
some of these papers so they will look a little bit better especially this one I
want to incorporate this nice piece of paper this is the one that kind of looks
like old newspaper and it looks perfect for you
in kind of the background so I'm incorporating it back in and when you
rip a paper there's two ways to rip it if you want to have it I like to the
smooth line or if you want to have kind of like that white on it so it doesn't
really matter I like having that white on it but I cut it the wrong way so I
can always go back and kind of add a little bit of that ripped look to any
paper okay perfect so that I would be kind of the first back for the first
area that I'm going to use and just to show you the picture that I'm going to
be using it kind of fits perfectly this is like on a vacation of me of my
husband I printed this out of I'll show you this is my HP sprocket sorry I have
this plugged in and what I do is out this pins it prints two by three
pictures and then maybe they're not the perfect quality but I just don't really
care this is just for scrapbooking it's just for my own enjoyment realistically
are we gonna look at these pictures in fifty years from now I don't know if
somebody else I made so many layouts so it's hard to know if anybody will want
to see these so I'm just more doing this because I love creating layouts and I
love enjoying the process of it so I. Printed this out of the sprockets so
it's a small picture so I can fit a lot of things behind it I love this this is
really nice again I'm gonna rip maybe see if it fits underneath here I want
I'm going to show some of these really cool designs and they're hiding here so
that's not fun so what I do is like kind of her rip it in half and that way I can
show the top a little bit and this bottom will kind of stick underneath
here so it pretends as if it's longer I always fake the lengths of things by
doing that there we go then I have that I like this one is nice
this one I don't particularly like the word Boston there per se it has nothing
to do with what I want to say I think it would look good and again the same thing
I can't fake it I can't fake doing this let's see then like when I say glue
everything it kind of all comes together too many words here not sure if I want
green grocer and a white sis grocer on it maybe I should just so I like kind of
incorporating things like that I like the ripped look things move around and I
let them move them back and things like that I don't know what else do I want do
I want to include this one is that it enough it kind of looks good I like this
flowery look we just you know I just incorporate some of the pieces that I
still have left over there we go a little bit of pink into it so this is
the back of that let's see I don't like this I don't know where to add it let's
see let's see let's see maybe to kind of lengthen this a little bit actually like
the pink on the other side much more and then I just glue it basically no it
looks nice a bigger piece of that pink so kind of like this I'm going to do it
another cool way of doing this and it's a really easy way of attaching all of
these is to use a stapler oops sorry there's stuff underneath me
here so I could like use a stapler and just staple things together this is my
mini attacher I learned this from my friend Rika she
does this stapling business so much easier sometimes than to have to glue
everything together but if you don't have a stapler just glue it it's not a
big deal it kind of just attaches everything
quite easily and you play around with the different designs like that and you
can always unstable it if you don't like it I like that goes behind kind of there
okay so you can put like two papers and staple of course and I run out of
staples let me refill my stapler again okay now that I refill the staples we
can continue on sorry about that as always things happen just want to
reinforce it here and then the same thing at the bottom
I never match it up it's the best way to match everything up such an easy way it
still adds like a really nice distressed look to it so it's a really good way of
adding layers it's a very simple fast way to add the layers there we go there
you have it so there we have some layers but I am going to kind of raise this
picture a little bit more and to do that you can do two things you could use
sorry you use like some tape to raise it or you
could use like old cardboard and cut a few pieces it's a good way of recycling
cardboard and it's also a good way to to you know raise something up for very
cheap if you don't have this type of tape so now it's time to embellish this
is my favorite part is basically cutting the flowers all around sense of things
like some things like sometimes things are too big so I might not use that so
the flowers come pretty flat so you want to you can bunch them up to make them a
little bit more like 3d kind of stick them underneath so that looks good I
love this green this is perfect for that cuz it matches it perfectly and this
pink is also perfect for that but I.
Might get like this one like this darker
pink actually I could include it it would look really good to just start
including a little bit of the darker colors so it's just basically playing
around with the flowers and just playing around the design so I might have I
might want to might want to raise it a little bit boughten a little bit more
even more that helps so that looks good like that and then I like adding like
smaller flowers the smaller flowers kind of help
empty spaces so smaller flowers I try to get like a little bit of different of
the different sized flowers because the different sized flowers bunched up
together make a huge difference in the design if things are a different size
then you can kind of create movement so the smaller flowers are really handy so
I'm putting like them here because I. Want to create this movement going up
having kind of attached this yet so it makes a difference you need to kind of
attach things so I even want to use some of these smaller flowers and the smaller
smaller flowers what I do with them is to continue that movement start moving
them down towards the bottom so it creates a really cool movement downwards
and to the side I really like that yeah there's some smaller pink ones here I
might want to use something I love opening everything and seeing what I
have and then going from there so if you don't have that many flowers obviously
don't put as many if you like it with less flowers put less flowers it just
sup to you alright look at these cute leaves they don't match but look at them
how cute are they okay so this is more or less my design
I can maybe like this one here okay so this is
more or less my design the way we look at scrapbooking
especially with the pictures is like kind of a triangle so I have things
everywhere that kind of Center things to the photo which is what's important
I'm gonna add more things to this not in terms of flowers but kind of tone it all
and bring it all together but right now I'm going to put some of these away I
think I put enough flowers I don't like over over overdoing it although some
people may say that I already overdid it but you know how it is I like certain
look so I just go with that so let's see so to glue these I use like fabric glue it does take a while sometimes to come
down especially if it's dry but it does glue everything really really well so I
want to start with this I know that I. Haven't glued the background I should
have glued the bathroom maybe I will do that now kind of stick some underneath
just so it doesn't move so stick some of these papers underneath try lifting them
up just so I could have this not move anywhere because that's very hard when
things are moving around that will hold things into place when I start gluing
the flowers so like I said you want to I. Know I love them when what I try to do
when I try to explain how I do it it's very hard to kind of explain what you do
but I like giving some tips so I like anchoring the photo what does that mean
means that you know to make it everything focus into the
photo you need to have something big anchoring the photos especially at the
bottom part so I tried to put the biggest flowers at the bottom and
closest to the photo if you put a full if you put a big flower kind of over
here your eyes gonna draw itself all the way over here so what you want to do is
you want to have the flowers the bigger flowers closer to the photo that way it
enters it and it remains like your eye remains close to the photo for example
this pink flower I think is too big for here and I just realized that now as I
was doing that so I think I will make me know okay well glue some other ones in
then we'll go and then I'll see what I.
Can do properly I might go get another
glue okay so I got another fabric glue just because it's very frustrating to
try to like force yourself to take it out this one was coming out so much
nicer so this blue you have to like kind of use it quickly don't wait too long to
use it because it does a silicon glue and it dries up when it's hard to get
out look how easy it is now today just get a little bit stringy when it's too
wet but that's okay so much faster to glue this way so as I said so I'm trying
to as I said I putting that bigger ones they're bigger flowers towards the
center closer to the photo and then the smaller flowers as you can see go kind
of to outside of the photo that way I. Mean towards the bottom or towards the
sides that way you get that flow and it kind of centers
everything towards the photo and that's my trick my tip that's how I arrange my
flowers incorporate everything in different places there we go that's
better problem is I don't know when to stop I
kind of like it already but I sometimes don't know where to stop where did you
draw the line with adding flowers I just love adding flowers now I'm thinking
maybe two I'd like something here from this Chipwich collection let's see I
haven't decided that's kind of like was a last-minute thing I love these pears I
wish I could like incorporate this let's see if there's a way to incorporate this
anywhere you know it's nice like that looks weird oh that looks nice
okay so I'm going to do that but I can't have this like sticking out into the
nothing so I'm going to have to put like a flower here it's silly but that's how
it goes right like it's just let's see which flower would be good
where's that pink point that I was going to add somewhere what did I do it because it's tall enough that would fit
there now that looks cute so kind of draws the
eyes that way as well so let me glue that this might be nah
maybe it's too tall you think I should put a shorter I think I should put a
shorter one but it has to be pink okay that's good
so let me glue this and you know like some of the flowers come with layers you
could take them apart and use it as two flowers I've done that before as well
I'm not doing that today but I'm done that before I mean this is celebrate it
doesn't really go with this but I really like the banner so I'm kind of going
with it doesn't really matter I'm gonna put a little bit of glue behind here so
it kind of glues to the flower it stays in place even though that the chipboard
Czar's have a sticky background I'm gonna do that and let's see what else I
like the bird hearts so for this one I love this perfect for
that and - I think love is also a good title for this this is me and my husband
I think we can manage with writing loved on this yeah I'd like that or should it
go here yeah that's good okay so that's basically more or less than the stuff to
add like the finishing touches which are a few but you still have to add them
because kind of things got lost in all the stuff that we added the first thing
I like doing is adding some of the white gesso back into it so to do that I take
the white gesso and I take a paintbrush and I kind of bring things together by
adding the white gesso and creating the highlights on top of the flowers how you
do that on all the flowers and I even sometimes do it and add some more
texture on the background as well so sorry so what the gesso does is that it
kind of brings the whiteness back into it because I put a lot of color right I
put a lot of color here and sometimes the color kind of overpowers everything
so by adding just so it kind of tones down everything tones down the flowers
it makes it kind of bring the background back into and kind of tie it all in so
it brings the background it tones down whatever like I don't want to have to
too much of it so for example that I. Love the coral colored flowers but I
think they need to kind of tone down and mix a little bit into the background so
they just so helps with that and it's one of my favorite techniques to do and
it's not my technique but it's one of the favorite techniques that I like
doing you can even like add a little bit of distress on the photo and again put
too much gesso there I want to fully cover it I just want to add a little bit
of that distress look and to blend things in so they look like they're part
of the background and it kind of starts blending with things to how we started and that's one of the tricks that I love
doing so if something is too dark you can always turn it down right so you can
tone it right here and then I'm gonna dry everything right and what I'm going
to accomplish with that is that once it's dry I can actually add more of that
color that I had before I might even add a little bit of the coral and mix it up
as well and that's a good way and I. Think I kind of missing something here
I'm not really sure what it feels like I'm missing something right about here
what could I add here okay I brought in some things this is more from my from
the past these hearts they're shabby-chic treasures hearts and I just
thought they would look cute here I kind of tested it before to tell you
to make sure that it looks nice and also what brought this tassel I really want
to kind of like to hang it over here I'll glue that though
and then this heart is kind of to fill that area where I said it's hard you
need to kind of fill this area here and then I'm just going to glue it I mean
just look for embellishments anything that you may have from the past that you
have been storing and you know you've been wanting to use this is a great time
to use it on your layouts don't store it just use it and I don't know if these
are still available I might not be able to link these but at least I can link
everything else and just cut your own embellishments it doesn't have to be
exactly the same it's just a matter of creating something that you love and
just kind of using the same tips that I've already shown you to you to do
something else and that looks a little bit let me see I'm trying to think I
wound up tying into the flower we should have those tiny tiny ones maybe this one
would work no it's too much so when things go out of balance I try to put
things back into balance by adding something okay there we go
so now that I'm done this thing I can go back and add some color to it so I go
back to my palette the one that I used before but I maybe add a little bit of
more like the pink and to kind of accentuate the other things that are on
it those colors that are on here it's not the exact match of pink but it still looks pretty nice and with it with the other color with
green or with the T oh it looks really really pretty it's hard to get sometimes
the exact match color but it still looks really really nice if you put it lightly
you're good just trying to kind of blend it a little bit more of a blend these
two together maybe it will give me more of a coral color looks more like the
coral that I have here yeah there we go so blending colors helps and just adding
a little bit more color kind of bringing it all together and just having its fun
with it I mean it's just basically creating right you could dry it up as I
said it also brings some of that texture that kind of got hidden brings it into
the light oh there's the texture that is hidden so let me put some more for the
green so you can like start like using both colors right and adding adding it
to the background and if it's missing in some places you can go ahead and add you can add color into the embellishment
some of the flowers and it really makes everything stand out the color kind of
brings it all together that's what I.
Like about adding more color after another you have to do is just dry it up
and then you're done I love making beach themed layouts love-love-love and every
single layer kind of adds to it and there is there it is there is my layout
I almost want to add more stuff to it because I just always have so much fun
with it one of my favorite things to add is little stones maybe I should add some
stones to it so sometimes I tend to add these mega stones I know I can't stop I
have this thing where I can stop I want to add more and more and more things so
I use the soft gel to just add so just add a little bit more texture to this I'll take one of these paintbrushes dip
it in and just add some texture so it's just adding layers and you can skip any
of these layers you do not have to add all this stuff that I added I like
adding a lot of layers to my because there are kind of mixed media and I love
mixed media but you don't have to add so many layers you can go and like stop
halfway you don't have to do what I'm doing
I just love the creating like that texture that rich texture so that's why
I do it that's the only reason why because I love the way it looks but some
people I think it's too busy and they say that I should stop and that's okay
as well okay every person has like what they like and what they don't like and
you have to go with what you love it doesn't have to be like mine I'm just
teaching you techniques on how to use like things in your layouts but you
don't have to do it this way you can just go ahead and make your own make
your own thing so there we go it's a little bit of more texture kind of
brings it all in brings it all together I think personally and things are not
dry yet so I need to kind of dry them first and you can also create movements
you can like kind of bring these as if they're falling stones I like that as
well and dry this really really well it's so important so I'm gonna let this
dry naturally because I have other things to work on but if you don't have
patience just go ahead and dry it just want to thank everybody for coming and
joining me on my youtube channel again thank you so so much if you loved my
video please give it a thumbs up share with your friends on social media and if
you create something that is similar with and you love some of my techniques
that I use on my layouts feel free to share with me thank you so so much and
have an amazing day bye you.